Modelio
Modelio is an open source modeling environment supporting a wide range of modeling languages: UML and BPMN in a native form but also SysML or TOGAF for example.

Modelio is high extensible via java modules or python scripts . Modelio runs on Windows, Mac, and Linux.
Features
Modelio if a full-fledged modeling environment supporting:
- model edition and validation for a wide range of modeling languages,
- model distribution over the web,
- model versioning with SVN (commercial edition only),
- documentation generation,
- code generation and or reverse engineering of C++, Java, C#, Hibernate, SQL, XSD...
Modelio can be extended to add more features via java modules or python scripts.
Installation
Modelio exists both in an open source and commercial version. You need a licence in the later case.
Tip
If you have a licence code you can install both an open source version
and a commercial version on the same machine. Just use different
directories such as %SCRIBESTOOLS%\ModelioOpen and
%SCRIBESTOOLS%\ModelioCommercial.
Attention
The architecture (32bits or 64bits) of your modelio and java installations
much match. If this is not the case then launching modelio will likely
generate a java error exit code 13. If you want to check which architecture
is used by your java installation open a shell and type java -version.
If this information is important it will be displayed on the 3rd line.
Installing modelio open-source
- Go to the modelio download center and download the archive for your platform.
- Copy the archive into the directory that will contain the software
(e.g.
%SCRIBESTOOLS%\ModelioOpen). - Extract the archive and then rename it into something like
%SCRIBESTOOLS%\ModelioOpen(you may want later to install the commercial version as well or another version).
Installing modelio commercial
Attention
You need either a node-locked licence or a floating licence to execute a commercial version:
- node-locked licence (personal use).
You may have received a licence code that looks like
3BA5A-AVAT9-RUEJD-WK4LP. In this case after the installation you will have to enter this licence code following this procedure (web). Beware: a licence code can be used only in a single machine and when used on a machine it is impossible to move to another machine.
- floating licence (with organizations).
If you are running modelio for the first time in the context of an organization (e.g. at UGA), Modelio may ask you to enter the reference of a licence server following this procedure (web). You will have to enter the information of the licence server (e.g. at the UGA the host name is
152.77.82.15and the port is6200
Launching Modelio
If a shortcut has been created to launch Modelio (it depends on your platform), you just have to click on it. Otherwise you can click on the executable (modelio or modelioexe) in the installation directory.
Modelio can be launched within a script or from a shell with a command line
like that (here the installation directory is %SCRIBESTOOLS%\ModelioOpen\):
%SCRIBESTOOLS%\ModelioOpen\modelio.exe # modelio on unix
It could be wise to create a command to add parameters (or to change the shortcut on windows) in order to display the console window and run the Modelio in debug mode (this allows to have more messages in the console in case of modelio errors):
%SCRIBESTOOLS%\ModelioOpen\modelio.exe -mdebug -consoleLog
If you get an error ‘exit code 13’ it is likely that the java and modelio architecture (32 bits or 64 bits) do not match.
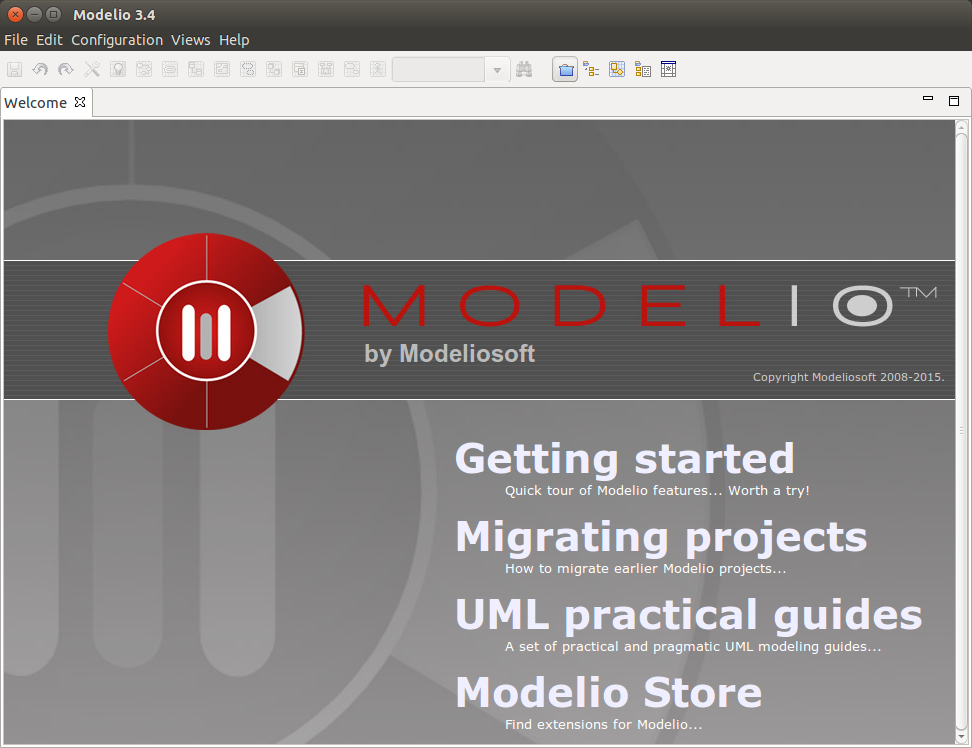
Note that on the first launch Modelio could take quite some time (up to a few minutes) to start. This could be the case on a slow computer or if your home directory is on a remote server. Modelio creates the ‘module catalog’ and this involves big files. After this, Modelio shows a “Welcome” page. You can simply close it.
Documentation
Documentation on Modelio is available from the Help > Help menu of
Modelio as shown below. You will most probably want to use the section
Modelio Modeler if you are just interested in using modelio.

Different kind of documentation is also available on the web:
- user documentation
- developer documentation (for developing extensions)
- FAQ
- a few tutorials (including some videos)
Tip
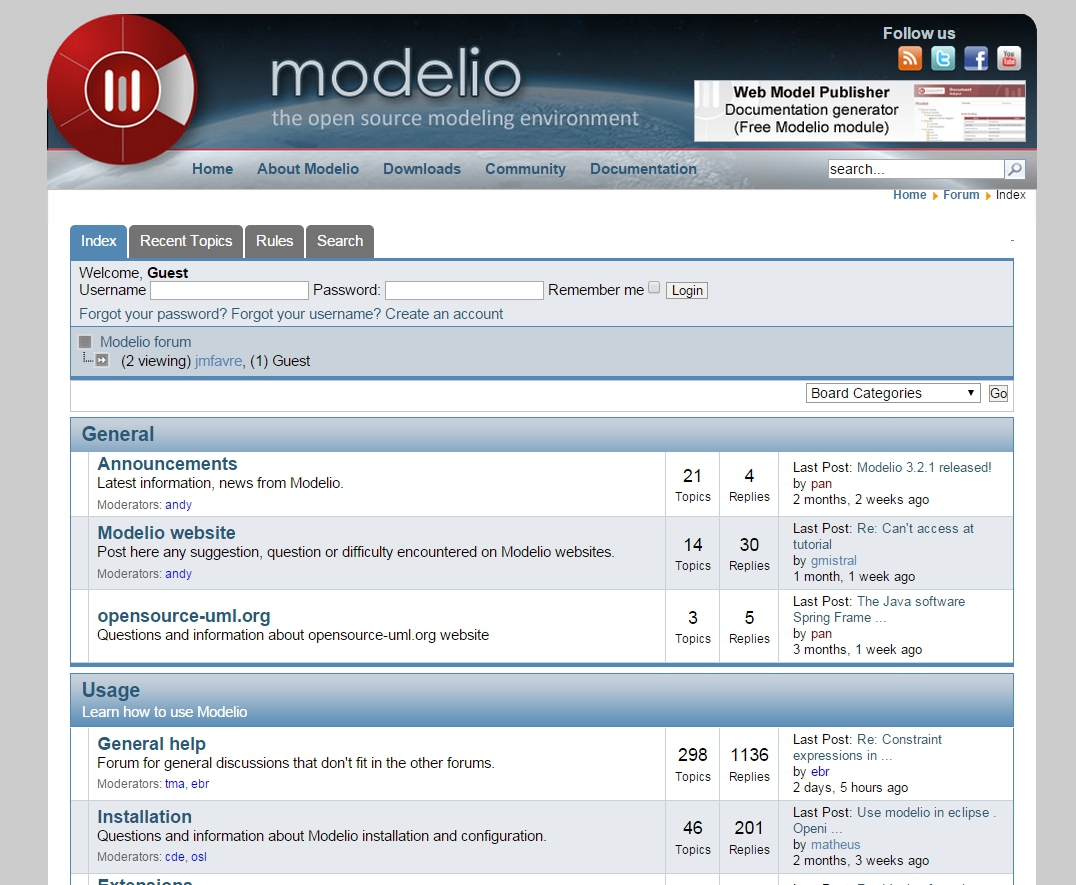
The forums provides also a very valuable source of information! Use the “Search” tab if you want to search some information about a given topic.
Working with Projects
Just like in many software engineering environments Modelio is based on the notion of “Workspace” (a directory) which contains “Projects” (subdirectories inside the workspace directory).
Do Not ...
The internal structure of “Projects” is entirely managed by Modelio and must be considered as a black box.
- DOT NOT makes any changes in a project directory.
- DOT NOT put in a DropBox or GoogleDrive in order to share the project with someone else. Various problems have been reported in the past, probably because of synchronisation processes.
- DOT NOT use git or versioning tools. Models are complex artefacts and merging will fail. You might also encounter problems if you use git for “backups”: git does not save empty directories and Modelio use a lot of them...
Project Archives
The only safe way to work with modelio is:
- to use the modelio user inteface to make changes during a modeling session,
- to use “project archives” to make project backups or exchange projects.
A “project archive” is a zip file created and managed by Modelio. Do not unzip these files. Use instead “Import” and “Export” functions of Modelio available in from modelio Workspace View. In practice these commands are available when no project is open:
- import: menu``File > Import a project``
- export: contextual menu on a project
Export a project(the project should be closed).
At the end of a modeling session, it could be wise to “Export the project”,
that is save the project in a .zip file like “MyProject-3.zip”. Saving
in it the workspace if fine. Just increment the version number each time to
keep an history of your work. If you want to restore a given version you will just
have to “Import the project” (you may want to save first the current one).
If you want to work with someone else, just send the last version. Your partner will:
- import the project archive ,
- work on it with modelio,
- make some backups (via exports) if necessary,
- send the last version to you when finished.
If you do not want to guest lost you should increment the version number each time you save an archive.
Scripting with Modelio
This section shows how to extend Modelio with its scripting feature. Jython is the scripting language. Jython is just Python running on a Java virtual machine. Otherwise this is the same programming language. Simply put Jython programs can call all python libraries but also all java libraries... Modelio is writen in java but Jython makes it possible to use its full API and this without the burden to compile, package, deploy java plugins.
The first sub section shows how to use Jython interactively
in the console. The next section shows how to store scripts
in .py files to ease development and use regular text
editors or python environments.
Using the console
In this section shows how to use the script console of Modelio. This is a really excellent feature of Modelio as this allowed to play interactively with models, explore the metamodel, experiment with transformations, etc.
Open an existing project or create a new one with a few classes and attributes. This will make it possible to run the macro below on some example.
Using the browser on the left, select some classes that contains attributes.
Choose the menu
View > Script. This open the python engine (this takes a few seconds the first time. A Jython interpreter is loaded).Type the following line in the console and then press
Ctrl-Enter:print "Hello World"
Observe the result. Try other expressions such as
print 'a'*3.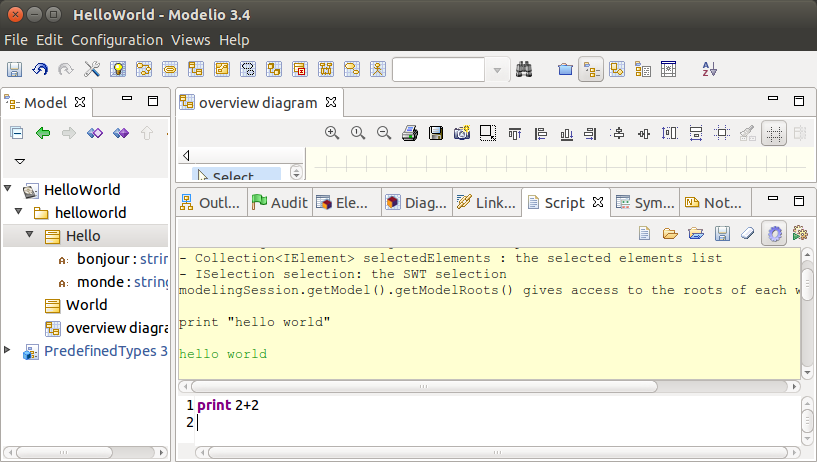
Then copy-paste the following program to the console and press
Ctrl-Enter:for c in selectedElements: if isinstance(c,Class): attributes = c.ownedAttribute print '<h2> %s <\h2>' % c.name print 'The class %s has %i attributes: <ul>' % (c.name, len(attributes)) for a in attributes print '<li> %s : %s </li>' % (a.name, a.type.name ) print '</ul>'
You might get an error message like the following one (displayed in red):
'... line 1 ... SyntaxError: mismatched input ' ' expecting EOF'
If so this is due to some extra spaces in the copy paste. Python is based on the indentation to represent blocks. If there are some extra spaces before the first line (
for c in...) the interpreter will complain: a top level statement is expected (hence no spaces).As you can see, the code you have just pasted has disappeared when you press
Ctrl-Enter. This is n really convenient... Press the icon that looks like a ‘blue gearing’ (the penultimate logo in the console toolbar). The tooltip on this logo is ‘Activate/Desactivate debug mode’.
In fact, this mode just allows to keep the text in the console instead of erasing it when
Ctrl-Enteris pressed. Copy the program above again, check for spaces and pressCtrl-Enteragain. Now the program stays in the console. If there there are still some space problems you can correct the program there.At some point you will get the following error:
'... line 6 ... expecting COLON'This is because all composed statements (for ... : , if ... :, etc) must have
:at the end to indicate that a new block is going to start. Java programmers often tend to forget this:and will get this error. Otherwise the python syntax is rather straight forward. Correct the program by adding:afterfor a in attributesand pressCtrl-Enter.
A little “html generator” has been developed in a few lines of code. If you select some classes in modelio browser (on the left pane) and run the program you will see the list of classes with their attributes in html. Obviously if you want to see a nice result you should put this in a .html file and launch a browser, but this is another story (googling something like “python write lines in file” will probably bring you close to the solution).
Writing code in the console is very convenient for testing code snippets interactively. However if you want to develop more complex programs and deliver it to other users, Modelio ‘macros’ should be used.
Developing macros
Macros are just Jython programs saved in a file. That’s all.
The only things to know is where to put these files and where to register it. Macros can be located in three difference places (but not elsewhere, this is a current limitation of Modelio):
- Project macros. This location is only useful for macro that are specific to a particular projects. Most of the time this is not the case. So the project location is seldom used.
- Workspace macros. These macros can be used in all projects within this location. This option is the most convenient and this is the one that you are going to use.
- System macros. These macros are located in your
.modelio directory, but are normally not for users-defined macros.
Macros are just python files with the .py prefix. Workspace macros are
stored in the macros directory of the workspace. In order to make macros
accessible from the Modelio user interface, the macro should be registered in
the ‘macro catalog’: the XML file named macros/.catalog. As an illustration
the following .catalog file will register the helloworld.py macro.
<?xml version="1.0" ?>
<catalog>
    <script name="HelloWorld" path="helloworld.py" icon-path="" show-menu="true" show-toolbar="true">
        <description></description>
    </script>
</catalog>
There is one <script /> element per macro. Just create the file macros\helloworld.py as following:
print 'hello world!'
Modelio should be restarted in order for the macros to be registered.
But don’t worry, this should be done only once! It is indeed not very common to
add macros. Restart modelio and open a project (in the workspace containing the
macros directory just modified). A button HelloWorld should appear
in the toolbar just below Modelio menu bar.
Pressing it will execute the content of the file. The good point is that now
that the macro is registered everything becomes really handy. Use your favorite
editor (notepad++, vi, gedit or a python environment like PyCharm
(see ref:PyCharm) and change
the file as you want. Just press again the HelloWorld button. The code
is executed immediately. No compilation, no packaging, no deployment. Try
to develop plugins written in java for eclipse and you will see the difference...
The benefit of python is right there.
Learning Jython
Learning Jython is just learning Python as this is actually the same language. There are plenty of resources available on the web. Just google “python” with a few terms and you have good chance to get the answer to your question.
To start look at the Documentation section of the Python. You will find some useful cheat sheets. Have also a look at the slides “J/Python in a Nutshell”.
In fact for creating simple macros for Modelio, Jython/Python should not represent an issue. One just have to know how to write:
- conditional statements:
if cond:else: - loops
for e in expr: - functions
def f(x):
The challenge is in fact to deal with the Modelio API and in particular with Modelio metamodel.
Modelio metamodel
The Modelio API is based on Modelio metamodel. This metamodel integrates in a single metamodel 3 languages:
- UML the Unified Modeling language, an international standard.
- BPMN the Business Process Modeling Notation, an international standard.
- “Analyst” a modelio proprietary language for requirements engineering.
The metamodel is made of about 300 metaclasses spread in about 30 packages.
Modelio metamodel is proprietary. Although is neither compatible with the standard UML metamodel nor the standard BPMN metamodel but it support most of the features of these languages (in an integrated way).
Note
The metamodel links depend on the version. Adapt the URLs according to the version of the UML/Modelio metamodel you use.
The are three ways to explore Modelio metamodel:
- browsing the “metamodel documentation”.
- browsing the “API javadoc”.
- using the “CoExplorer”.
Metamodel documentation
The metamodel is described in the modelio metamodel documentation. Each metaclass is described in an web page containing a class diagram centered around the metaclass. See for instance the page for the “class” metaclass.
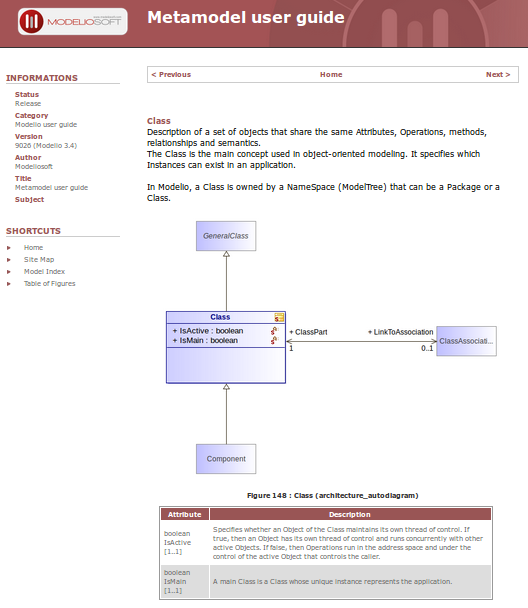
Documentation of the “class” metaclass
Note that the images are clickable. The best way to find a metaclass in this documentation is probably to use the metamodel index (and using the “search” feature of the browser).
API javadoc
Using the modelio API javadoc is another alternative. There are more than 500 classes and 67 packages in this API,but this is because the API provides many other services. The metamodel is just about “model mangagement”. In other words, all metaclasses are in the javadoc but there are more classes.
Have a look to the “class” metaclass javadoc and compare it the corresponding “UML” documentation. As you can see the content is the same although the javadoc page just reflects that the API is implementated in java. Naming conventions allows to go from the API to the metamodel seamlessly.
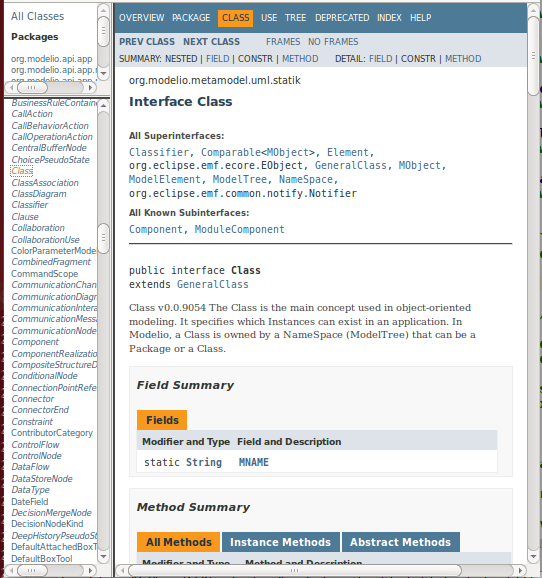
Javadoc of the “class” metaclass
CoExplorer
Another alternative, most probably the most convenient one, is to use the
CoExplorer plugin. This plugin (actually a jython macro) should be installed in order
to be used. Once installed select the elements to be explored in modelio and
then press the CoExplorer button in the top right toolbar.
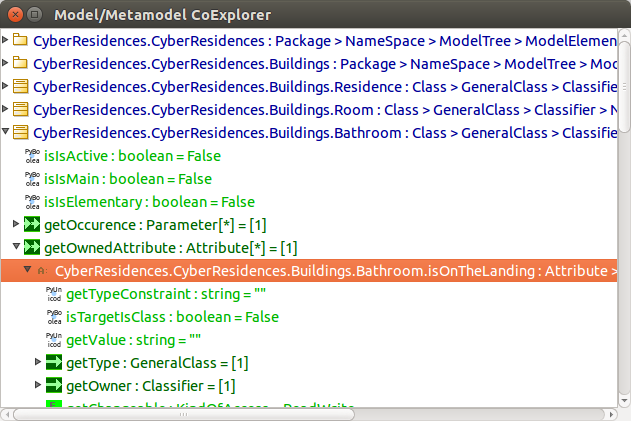
A session with the CoExplorer plugin.
The CoExplorer allows to explore at the same time a model and the metamodel.
TODO
to be documented
Collaborative Modeling with SVN
Thanks to the TeamworkManager module Modelio can store projet fragments
in a remote SVN repository. TeamworkManager allows various users to
work on the same model at the same time.
Warning
TeamworkManager feature is available only in some commercial versions
of modelio. The ultimate edition provides this feature.
It is not easy to configure behind a firewall. This section is reserved
to advanced users only.
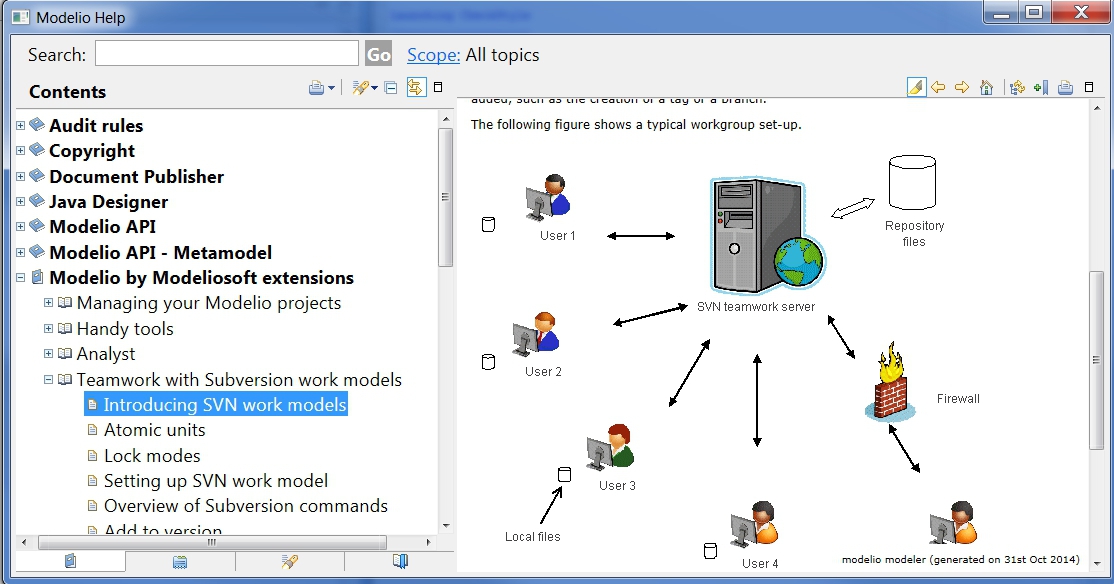
The documentation to create and use SVN fragments with TeamworkManager
is available in the menu help of Modelio (but not on the web). It can be
found in the section Modelio by Modeliosoft extensions > Teamwork as
shown in the figure below.
Creating a SVN repository
This step is necessary only to create your own reprository. This is not necessary if someone give you access to a shared repository.
To create the SVN directory itself you need to have a SVN server. If you don’t have one, you can use Assembla which is a free-svn provider on the cloud (see Assembla).
Connecting to a SVN repository
Open the project in which you want to add the access to SVN. A project is a
set of fragments; there is always one local fragment, the one where you
work. In this section a remote fragment will be added, the one that
correspond to the SVN repository.
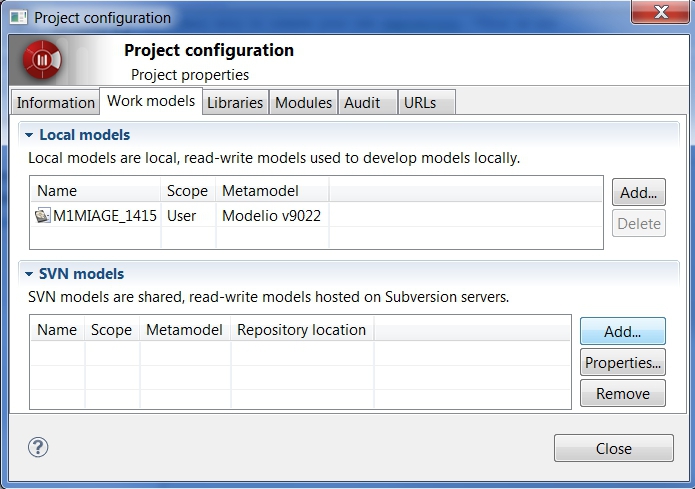
Work models are the fragments in read/write mode. That is, the fragment
where the developer work. To add the possibility to work on the SVN model
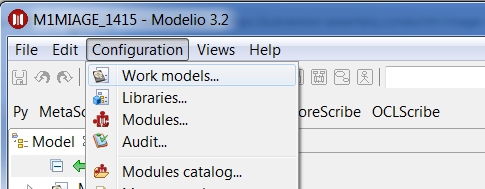
select the menu Configuration > Work Models.
In order to register the SVN repository as a remote work model, click the
Add button in the SVN models section of the following window:
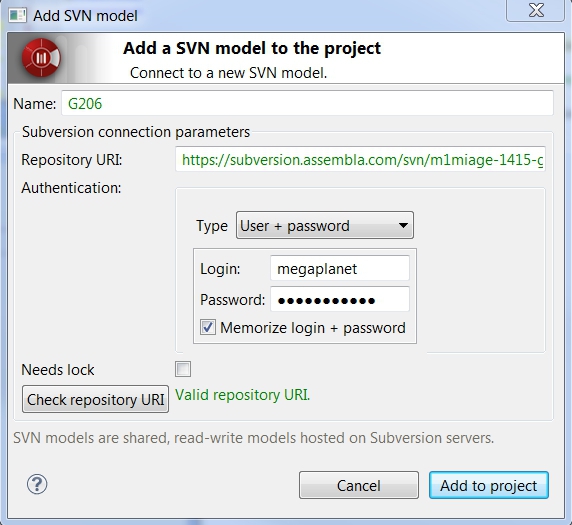
In the following form, you can choose a name for the fragment itself. The URI of the svn repository must be provided as well as the credentials for accessing it (if required). Checking the URI with the corresponding button is a good idea.
A new remote fragment is then available in your project as shown in the window below.
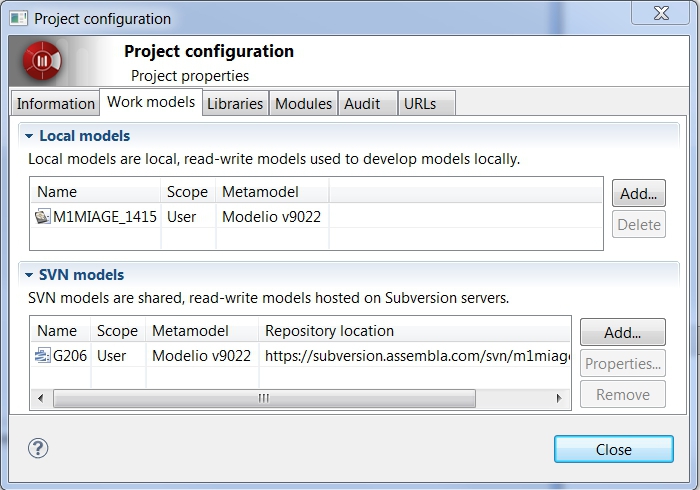
You should be able to use it and modifying it. The version control commands to use are mostly:
- update: to get the last updates from the central SVN repository,
- commit: to commit the local changes to the central SVN repository/